Scheduled Courses
Download Manual![]() This feature is available to Site Manager, Course Author, and Instructor accounts depending on system configuration.
This feature is available to Site Manager, Course Author, and Instructor accounts depending on system configuration.
The scheduling tool lets you offer in-person sessions such as instructor-led training, classroom courses, face-to-face instruction, and blended learning. Multiple sessions can be created from one product without making a copy of the product.
Here are more benefits of the scheduling tool:
- Create one product with multiple sessions
- Define the number of seats for each session
- Associate multiple dates to one product
- Define the session duration
- Offer each session in a different location
- Allow for a different instructor for each session
- Offer attachments for learners to download prior to the session
- Instructors may manually enrol learners on the fly
- Learners may register to a session through the course catalogue
- Learners may cancel their registration to a session any time before it starts
![]() The scheduling tool is available for self registrations through the course catalogue and to manual registrations. Access codes cannot be used to register users for a session. The scheduling tool is not currently compatible with the Informetica storefront.
The scheduling tool is available for self registrations through the course catalogue and to manual registrations. Access codes cannot be used to register users for a session. The scheduling tool is not currently compatible with the Informetica storefront.
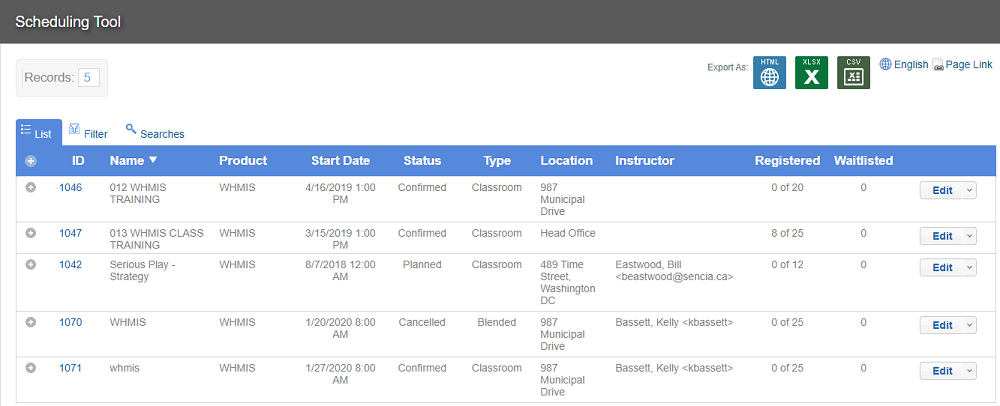
Scheduled sessions are displayed based on the user accessing the scheduling tool, as follows:
| User Type | Visible Offerings |
|---|---|
| Instructor and Publisher | Only scheduled offerings that you have created or that you are assigned to as the instructor. |
| Campus Admin | Any scheduled offerings that are in the same campuses that you belong to. |
| Site Manager | All scheduled offerings. |
Create a Scheduled Session
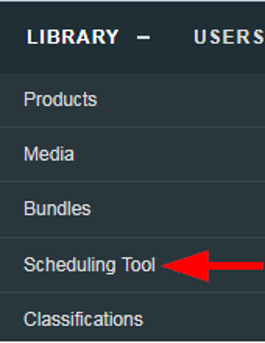
- Navigate to the Scheduling Tool.
- Select Create from the Options menu. If you cannot see the menu, show the Tool Panel.
- Fill out the form.
Field Name Field Type Required Description Name Text Input Yes Enter a name for the session. Description Text Input No Optionally provide details and links that append an existing course description. individuals will see the session description when they Click for Info in the catalogue. Bundle Drop-down No Narrow the product list by selecting a category bundle. Product Drop-down Yes Select the product for your session. Instructor Drop-down No Select an instructor for the session. Note that the instructor must be enroled to the product. The LMS will display a conflict alert if the instructor is already scheduled on the same date and time. A course can still be scheduled with the conflict in place. Location Text Input No Enter details about where the session is taking place. The LMS will display a conflict alert if the location is already scheduled on the same date and time. A course can still be scheduled with the conflict in place. Room Text Input No Identify the room that the session is meeting in. Status Drop-down Yes Select the status of the session. A status change does not run any LMS tasks and is not automatically affected by publish dates; status is more of an administrative tool. For more about statuses, visit Change Session Status. Type Drop-down Yes The delivery method is shown in the catalog (e.g. Classroom, Webinar). The enrol button will change based on the type. The type and enrol buttons can be renamed by a Site Manager. Maximum Attendance Text Input No Enter the number of spots/seats available or leave blank for unlimited. Once this number is reached, individuals attempting to enrol will see that the class is full. If an individual withdraws from the session, it will make a spot available. Start Date Date/Time Yes Individuals cannot enrol after the start date/time regardless of publish date and status. Instructors can manually enrol a individual past the start date. Note that the LMS displays all times in Eastern Time Zone. End Date Date/Time Yes The end date indicated when the session is over. Individuals generally should not not be enroled to a session that had ended. Note that the LMS displays all times in Eastern Time Zone. Published Date/Time No Select one of the two options to set a time frame to accept enrolments for confirmed sessions: - Publish Forever: This will open your session to enrolments from the time you create the product until the time you have changed the status to Completed.
- Publish Between: Set a specific date/time range to accept enrolments from the catalog and calendar.
Waitlist Number Input No An optional waitlist can be set with maximum number and cut off dates. Individuals on the waitlist can be manually moved from the waitlist to enrolment in the session. See Waitlist in the Scheduling Tool topic of hte Instrcutor manual. Attachment File Upload No After you create the session, you can edit it to upload files such as .ics, .pdf, and .docx to make them available to enroled individuals. To prevent calendar conflicts, you can attach only one .ics at a time. - Select Create or Save and Create Another to keep the data from the previous save and start a new session.
Edit a Scheduled Session
- Navigate to the Scheduling Tool.
- Select the Edit button for a session.
- Make the necessary changes and then Save.
- To change the status, see Change Session Status.
Copy a Scheduled Session
- Navigate to the Scheduling Tool.
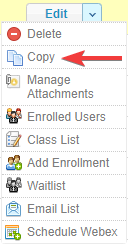
- Select Copy from a session’s Edit split button.
- Confirm your copy.
- Find the copy from the list of sessions and Edit it (e.g. change the date of the session).
The copy is created with the same name as the original session with the word copy in front of the title. - Save.
Manage Session Attachments
Upload files such as .ics, .pdf, and .docx to make them available to enroled users. Only one file can be attached during creation, however after creation, you can edit to add multiple attachments.
Add Attachments
- Navigate to the Scheduling Tool.
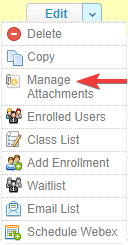
- Select Manage Attachments from a session’s Edit split button.
- Choose a method for uploading the file (ftp is for large files).
- Select the file from your workstation.
- Select Continue.
Delete Attachments
- Navigate to the Scheduling Tool.
- Select Manage Attachments from the session’s Edit split button.

- Select the Delete Icon for the relevant attachment.

- Confirm the deletion.
Create a Calendar File
Calendar items can be created in Outlook and saved as an .ics file. You can then attach the file to a session, allowing users to add the session to their calendar.
- Open Outlook.
- Create the calendar item.
- Choose File | Save as | iCalendar format (*.ics).
- Save.
If you have Product enrolment email alerts enabled, the email can automatically attach an ICS file if one exists for the scheduled session. Ensure the following criteria is met for this functionality:
- The scheduling tool is enabled for your LMS.
- An individual must be enroled to a specific scheduled session.
- An ICS file must be attached/uploaded that scheduled session.
Waitlist
The scheduling tool has an optional waitlist that you can enable for a scheduled session. The waitlist can be set with a maximum number of people allowed on the waitlist, as well as cut-off dates. Individuals to the waitlist can be manually moved from the waitlist to active enrolment by the instructor or other user type with the permissions (e.g. a Site Manager).
Navigate to a Waitlist
The waitlist lists all waitlisted users for the session as well as their position on the waitlist.
- Navigate to the Scheduling Tool.
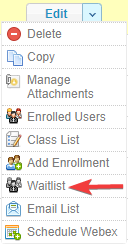
- Select Waitlist from a session’s Edit split button. If it's not visible, hide the Tool Panel.
- Optionally Export the list.
- Edit a Scheduled Session.
- Select the checkbox in front of Enable to create a waitlist for this session.
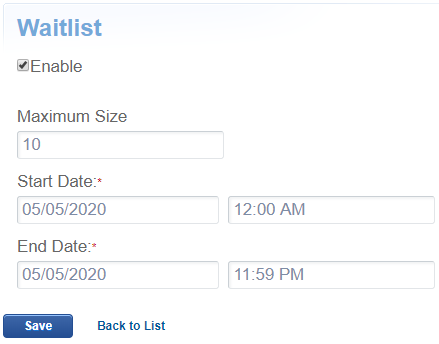
- Enter a number for the Maximum Size. This will limit how many users can be waitlisted.
- Enter the Start/End Date and optional times that a user can be waitlisted. A best practise is to prevent users from being waitlisted too close to the start of the session (e.g. two days before the session is scheduled).
- Save.
![]() An individual may only belong to one waitlist per product. If an individual is enroled to another waitlist for the same product, they are removed from their previous waitlist.
An individual may only belong to one waitlist per product. If an individual is enroled to another waitlist for the same product, they are removed from their previous waitlist.
Move enroled users to the waitlist.
- Navigate to the waitlist.
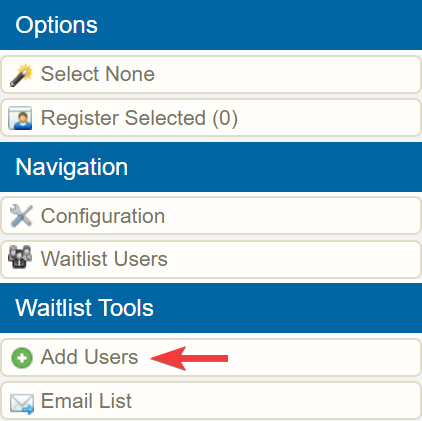
- Select Add Users under the Waitlist Tools. If you can't see the menu, show the Tool Panel.
- Optionally use Filter and Save Searches to locate specific enroled users.
- Search. If you did not apply filters, all users enroled in the session will be listed.
- Select the checkbox in front of each user you wish to add to the waitlist.
- Select Add to Waitlist at the end of the list of users.

![]() When enroling a user from the waitlist list, the system does not account for the session's maximum attendance. This is to give flexibility to special cases where adding users above the seat limit for the scheduled course may be applicable.
When enroling a user from the waitlist list, the system does not account for the session's maximum attendance. This is to give flexibility to special cases where adding users above the seat limit for the scheduled course may be applicable.
- Navigate to the waitlist.
- Select the users you wish to enrol.
- Select Register Selected under the Options menu. If you can't see the menu, show the Tool Panel.
Individuals removed from a wailist will not be enroled in the session. You may wish to enrol users from the waitlist instead (see above).
- Navigate to the waitlist.
- Select the users you wish to remove.
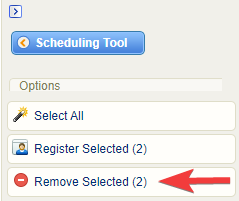
- Select Remove Selected under the Options menu. If you can't see the menu, show the Tool Panel.
- Confirm.
There are two automatic email notifications related to the waitlist that may be in use by your system.
- Added to Waitlist emails are sent when:
- An administrator adds a user to the waitlist
- A user adds themselves to a waitlist
- Removed from Waitlist emails are sent when:
- An administrator removes a user from a waitlist
- A user removes themselves from a waitlist
- An instructor removes a user from the waitlist
Email Session Participants
You can generate a list of email addresses for enroled individuals to notify them about changes.
- Navigate to the Scheduling Tool.
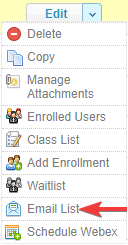
- Select Email List from a session’s Edit split button.
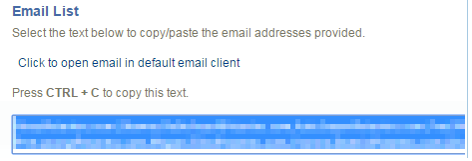
- Open your email application and then copy/paste the email addresses provided.
Change Session Status
Session Statuses
- Navigate to the Scheduling Tool.
- Select sessions.
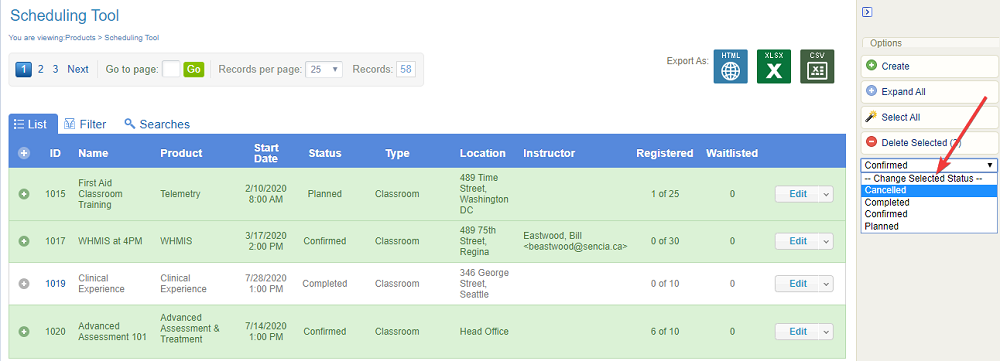
- Use the drop-down menu Change Selected Status under the options menu to change the status of all selected sessions. If you cannot see the menu, show the Tool Panel.
- Confirm the update.
Session Status Glossary
Session statuses can be used to help filter and organize the sessions. The status list shown below is not exhaustive; more statuses may be available on your system.
- Planned: This status indicates the session is still being prepared and it not yet ready for enrolments. It will also disable enrolment from catalog & calendar.
- Confirmed: This status indicates the session is ready for enrolment. It is also the only status that allows enrolment from catalog & calendar.
- Cancelled: This status indicates a once confirmed session that is no longer available. It will also disable enrolment from catalog & calendar.
- Completed: This status indicates the session that has ended. It will also disable enrolment from catalog & calendar.
Cancel a Session
- Open the Scheduling Tool and then select Edit.

- Change the Status to Cancelled.

- Save.
- Optionally email your class to inform them of the cancellation.
- To cancel mutiple sessions at once, see Session Statuses.
![]() Changing the session to Cancelled will remove it from the course calendar and enrolment drop-down menu, but does not remove a user’s enrolment to the product.
Changing the session to Cancelled will remove it from the course calendar and enrolment drop-down menu, but does not remove a user’s enrolment to the product.
Reschedule a Session
- Navigate to the Scheduling Tool page and then select the session’s Edit button.

- Change the Start Date and Time for your session.
- Save.
- Remember to update any file attachments, especially an ICS file, if applicable.
- Optionally email your class to inform them of the change.
Delete a Session
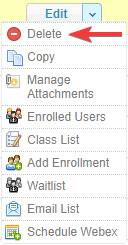
The delete option is available from the Edit split button on the Scheduling Tool page. You must confirm the deletion of the session before it is actually deleted. You can delete multiple sessions at once from the Options menu. The LMS does not automatically notify users about deletions. If necessary, you can generate an email list to notify enroled users.
- Navigate to the Scheduling Tool.
- Select Delete from the session’s Edit split button.
- Confirm the deletion of the session.
- You can delete multiple sessions at once from the Options menu.
Since different user types may view the Scheduling Tool page, deletion rules are in place as follows:
|
User Type |
Deletion Rights |
|
Site Manager |
Can delete any sessions. |
|
Campus Admin |
Can delete any displayed sessions since only sessions within their registered campuses are displayed. |
|
Instructor |
Can only delete the sessions they have created; cannot delete sessions created by other users. |
|
Publisher |
Cannot delete any sessions. |
For versioning and retention, it is recommended that you change the session status to Completed or Cancelled instead of deleting.
Session Attendance Sheet
Generate a simple class list of the individuals enroled to a session. The list can be opened in HTML or downloaded to Excel. You can print the list to confirm attendance in a classroom setting or use the Excel file to import completions to the LMS.
- Navigate to the Scheduling Tool.
- Select Class List from a session’s Edit split button.
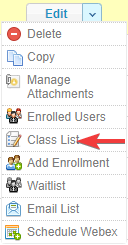
- Export the list to HTML or Excel to use as an attendance sheet.
Scheduling Tool Reports
R224 Scheduled Course enrolments is a dedicated scheduling tool report.
The following reports have a scheduled session filter. Please see the Reports Manual for more details.
- R202
- R203
- R204
- R208
- R213
- R219
- R301
Scheduling Tool Dictionary Labels
A Site Manager can change any of the buttons or navigation wording used in the Scheduling Tool. Here are the associated variable labels used with the Scheduling Tool. For more information on updating labels, see Languages and Dictionaries.
| Label Name | Default English Dictionary |
| name_product_offering_plural | Product Offering |
| name_product_offering | Product Offering |
| product_offering_name | Name |
| product_offering_start_date | Start Date |
| product_offering_type | Type |
| product_offering_status | Status |
| product_offering_location | Location |
| product_offering_id | ID |
| reports_select_product_for_offering | Select a product to view offerings. |
| reports_no_product_offerings | No available product offerings |
| product_offering_desc | Description |
| product_offering_room | Room |
| product_offering_enrolment_limit | Maximum Attendance |
| product_offering_publish_date | Publish Date |
| product_offering_publish_end_date | Publish End Date |
| word_attachment | Attachment |
| delete_product_offering_message | Are you sure you would like to delete the following Product Offering Records? |
| product_offering_edited | Edited |
| product_offering_created | Created |
| product_offering_cdate | Create Date |
| product_offering_edate | Edit Date |
| product_offering_status_1 | Cancelled |
| product_offering_status_2 | Completed |
| product_offering_status_3 | Confirmed |
| product_offering_status_4 | Planned |
| product_offering_type_1 | Classroom |
| product_offering_type_2 | Webinar/Teleconference |
| product_offering_type_3 | Live |
| 3219 product_offering_missing_product | You must choose a Product |
| product_offering_missing_product_offering_name | You must enter a name for the Product Offering |
| product_offering_missing_product_offering_start_date | You must enter a start date |
| product_offering_generating_file | Generating File. |
| product_offering_attach_file | Attach File |
| product_offering_type_4 | Blended |
| tab_product_offering | Product Offering |
| product_offering_upload_title | Add Attachment |
| product_offering_upload_choice | Select method to add attachment |
| product_offering_ftp_upload | Manage FTP |
| product_offering_http_upload | HTTP Upload |
| name_product_offering_media_list | Manage Attachments |
| product_offering_filename | File Name |
| product_offering_file_last_modified | Last Modified |
| product_offering_file_size | Size |
| product_offering_media_list_no_media | No media elements exist. |
| product_offering_delete_media_confirm_title | Confirm Attachment Delete |
| product_offering_delete_media_confirm | Once deleted, an attachment cannot be recovered. Are you sure you want to delete the following? |
| command_manage_attachments | Manage Attachments |
| word_publish_forever | Publish Forever |
| word_publish_between | Publish Between |
| word_published | Published |
| disable_catalog_registration | Disable Catalog Registration |
| command_add_to_calendar | Add to Calendar |
| command_click_for_info | Click for Info |
| command_click_for_attachments | Click for Attachments |
| command_drop | Drop |
| product_offering_email_list | Email List |
| product_offering_email_list_empty | No registered Users at this time |
| command_email_list | Email List |
| command_class_list | Class List |
| name_html | HTML |
| name_excel | Excel |
| product_offering_email_list_choice | Select file type of choice |
| product_offering_class_list | Class List |
| product_offering_num_enrolments | Number of enrolments |
| class_list_header_lname | Last Name |
| class_list_header_fname | First Name |
| class_list_header_username | Username |
| class_list_header_attended | Attended |
| class_list_header_other | Other |
| class_list_header_integration_username | Integration Username |
| word_attachments | Attachments |
| confirm_drop | Confirm Drop |
| product_offering_email_list_instructions | Select the text below to copy/paste the email addresses provided. |
| word_generated | Generated |
| product_offering_class_list_title | Attendance Sheet |
| product_offering_mailto_text | Click to open email in default email client |
| command_add_registration | Add Registration |
| course_catalog_no_bundle_name | Miscellaneous |
| command_register | Register |
| add_registration_instructions | Click Search to get list of unregistered Users |
| add_registration_none_found | No Users were found |
| product_offering_choose_offering | Choose Product Offering |
| product_offering_type_1_register | Schedule Now |
| product_offering_type_2_register | Register Now |
| product_offering_type_3_register | Schedule Now |
| product_offering_type_4_register | Register Now |
| course_catalog_status_not_registered | Not Registered |
| course_catalog_registration_completion_status | Completion Status |
| course_catalog_completion_complete | Complete |
| course_catalog_completion_incomplete | Incomplete |
| course_catalog_you_have_registered_for | You have registered for |
| course_catalog_approval_pending | Approval is pending |
| confirm_registration_title | Confirm Registration |
| confirm_registration_content | Are you sure you would like to register these ([[ entity_count ]]) Users? |
| registration_success_title Registration | Successful |
| registration_success_content | Users registered successfully |
| course_catalog_no_items | No course catalog items available. |
| course_catalog_switch_view | Switch View |
| product_offering_maximum_enrolment_reached | Maximum enrolment reached. |
| product_offering_too_many_users_title | Alert - Too many users selected |
| product_offering_too_many_users_text | Operation cannot be completed. Maximum enrolments left |
| product_offering_enrolments_left | enrolments Left |
| product_offering_warning_enrolment_limit_reached | The Product Offering has reached the maximum enrolment limit of |
| product_offering_entity_type_4 | Instructor |
| product_offering_enrolment_limit_invalid | Please enter a valid number for maximum attendance |
| product_offering_add_registration_title | Add Registration |
| course_catalog_calendar_course_info | Courses without scheduled dates are not visible on the calendar. |
| product_offering_ics_warning | Only 1 ISC file is allowed. An *.ICS file upload will overwrite an existing ISC file. |


