Registration and Enrollment
Download Manual![]() Some or all of these features may not be in use for your system.
Some or all of these features may not be in use for your system.
There are several methods to manually enrol users. This chapter covers the type of manual enrolments available to Manager accounts.
- Scheduling Tool enrolments are covered in the Instructor User Manual.
- The manual enrolment methods available only to Site Managers are covered in the Site Manager User Manual.
![]() Systems that use automatic enrolments (e.g. via an integration, single-sign-on, or automatic enrolment by user group), should use these enrolment methods with caution.
Systems that use automatic enrolments (e.g. via an integration, single-sign-on, or automatic enrolment by user group), should use these enrolment methods with caution.
Campus Enrolments
![]() This feature is available to Site Manager and Manager accounts depending on system configuration.
This feature is available to Site Manager and Manager accounts depending on system configuration.
Users may be added to any of the campuses available to the account.
- Log in with Site Manager or Manager account.
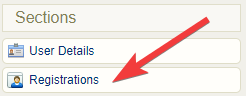
- Navigate to the user's profile.
- Select Registrations from the Section menu.
- Select the campus from the drop-down.
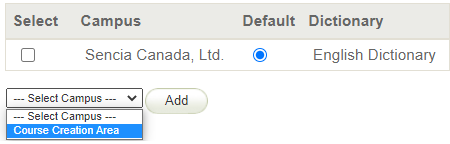
- Select Add.
![]() You can enrol one campus at a time from the user’s profile. The user is not removed from other campus enrolments.
You can enrol one campus at a time from the user’s profile. The user is not removed from other campus enrolments.
- Log in with Site Manager or Manager account.
- Navigate to the user's profile.
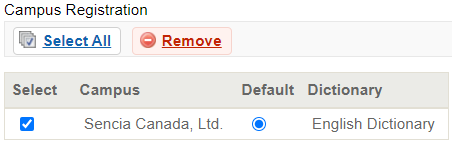
- Select the campus to remove.
- Select Remove.
- Use Select All to remove several campuses at a time.
![]() The system requires the user to remain enroled to at least one campus.
The system requires the user to remain enroled to at least one campus.
![]() Changing the default campus can affect system relationships. Use caution, especially if your system uses single-sign-on (SSO) or has an integration with a 3rd party system. Changing the default campus can affect system relationships and determine which theme (skin) is applied and which language and email alerts an account sees.
Changing the default campus can affect system relationships. Use caution, especially if your system uses single-sign-on (SSO) or has an integration with a 3rd party system. Changing the default campus can affect system relationships and determine which theme (skin) is applied and which language and email alerts an account sees.
The default campus can determine which theme (branding, colours) is applied and which language and email alerts an account has access to.
- Navigate to the user's profile.
- Select the campus from the drop-down menu under default campus.
![]() The user is not removed from their former default campus enrolment.
The user is not removed from their former default campus enrolment.
Enrolment via Access Code
![]() This feature is available to Site Manager and Manager accounts depending on system configuration.
This feature is available to Site Manager and Manager accounts depending on system configuration.
Manager accounts must have an access code made available to them before they can enrol users to a product unless they are using the Scheduling Tool. For some systems, a Site Manager may need to create and set up the access code on your behalf. See Access Codes for more details.
![]() When enrolling users with an access code, the LMS limits the selection to one page of users at a time (a maximum of 100). See Pagination for more details.
When enrolling users with an access code, the LMS limits the selection to one page of users at a time (a maximum of 100). See Pagination for more details.
![]() Users enroled via an access code are enroled in all user groups and products defined in the access code.
Users enroled via an access code are enroled in all user groups and products defined in the access code.
- Navigate to User Accounts.
- Optionally use the Pagination and Filter Options to define the results.
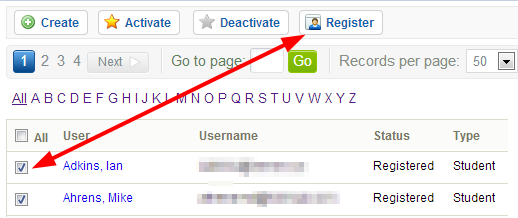
- Select the check boxes for each user that needs to be enroled or select All to select all users on the page.
- Select Register at the top of the list.
- Select an access code from the drop-down menu.
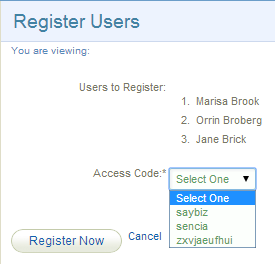
- Select Register Now. A summary screen will confirm the enrolments.
- Optionally select the check boxes to send users an enrolment email.
- Navigate to User Accounts.
- Optionally use the Pagination and Filter Options to define the results.
- Select the check boxes for each user that needs to be enroled or select All to select all users on the page.
- Select Registration to Access Code from the user options menu. If you can't see the menu, Show Tool Panel.
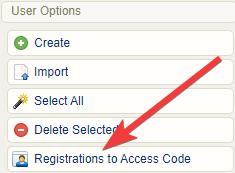
- Select an access code from the drop-down at the bottom of the page.
- Select Register Now. A summary screen will confirm the enrolments.
- Optionally select the check boxes to send users an enrolment email.